
 Save
Save
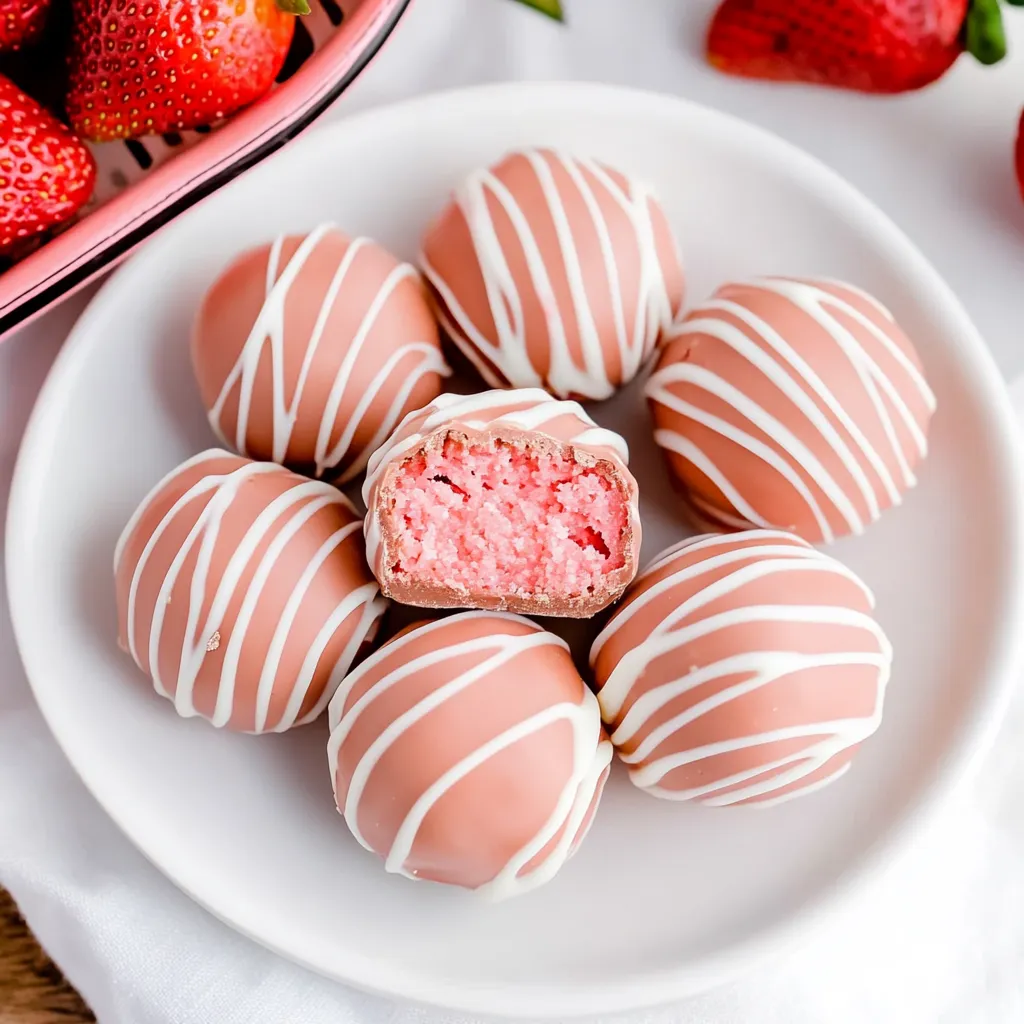
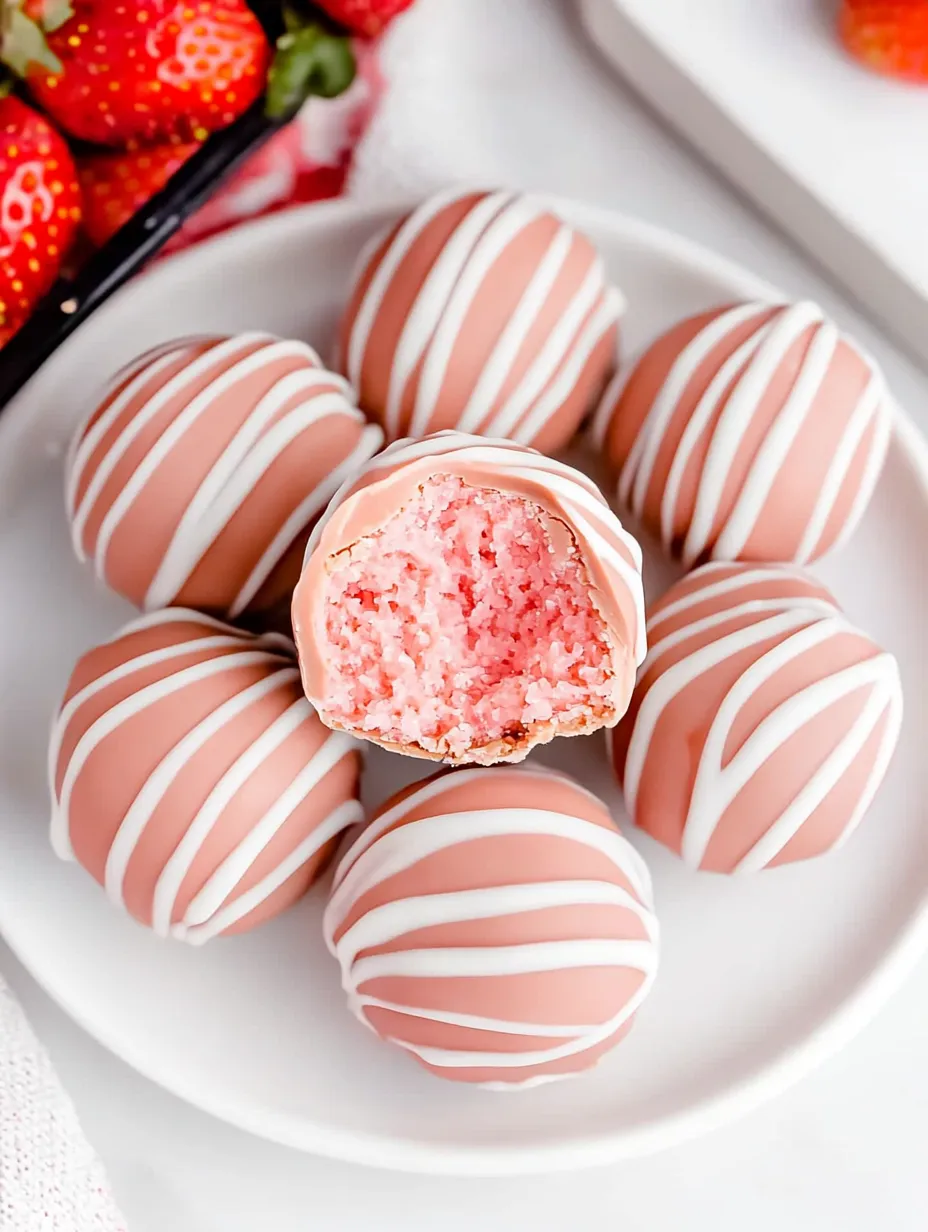
Strawberry Cheesecake Bites deliver everything you love about classic cheesecake with sweet strawberry flavor and the fun of chocolate-coated truffles. These no-bake treats are creamy inside with a stable candy shell outside so you can transport and share them with ease.
My kids go wild for these strawberry cheesecake bites and I love how quick they are to whip up If you are looking for the perfect party sweet these will disappear every time
Ingredients
- Strawberry cake mix: gives these bites their signature flavor and color Look for a mix without artificial aftertaste and check the date for freshness
- Cream cheese: creates the creamy dreamy cheesecake texture Use full fat for richness and let it soften fully so it blends smooth
- Pink candy wafer melts: form the crisp shell and highlight the pretty interior Choose a brand with cocoa butter as the first ingredient for the best snap
- White almond bark: offers a gorgeous drizzle and extra layer of sweetness Pick almond bark that is glossy and free of white streaks
Step-by-Step Instructions
- Heat Treat Cake Mix:
- Pour the dry cake mix into a microwave safe bowl and microwave for two rounds of thirty seconds stirring after each This kills any bacteria found in raw flour Let the cake mix cool completely before proceeding
- Cream the Cheese:
- In a medium bowl use a handheld mixer to beat the cream cheese for two to two and a half minutes until smooth with no lumps This ensures a uniform filling
- Mix in Cake Mix:
- Sprinkle the cooled cake mix over the cream cheese Mix gently until combined Do not overbeat to keep the mixture thick enough to shape
- Chill Mixture:
- Cover the bowl tightly and place it in the fridge for two hours This firms up the dough so your bites will hold their shape
- Shape Cheesecake Bites:
- Line a baking sheet with parchment Using a tablespoon scoop out dough and roll into smooth balls Place them on the sheet and repeat until all are formed For best results let shaped balls chill another hour or overnight
- Melt Wafer Coating:
- Add pink candy melts to a heat safe bowl and microwave in thirty second bursts stirring each time until fully melted Use slow careful heating to avoid scorching
- Dip and Coat:
- Roll each chilled ball in the melted candy using a fork to lift out and let excess drip before placing on the baking sheet Patch bare spots with a spoon or drizzle coating as needed Use a toothpick to clean up the base for a neat look
- Melt and Drizzle Almond Bark:
- Place the white almond bark in a small bowl and microwave in short intervals stirring until fluid Drizzle over the coated bites using a spoon or add it to a plastic bag with a snipped corner for extra control
- Chill to Set:
- Return the decorated cheesecake bites to the refrigerator so the shell firms up fully before serving
My favorite part is watching my kids swirl the drizzles on their own batches If you love a tangy twist try working in a few freeze dried strawberries for a bigger berry punch
Storage Tips
Store the cheesecake bites in a single layer in an airtight container in the refrigerator They will stay fresh for about five days Place wax paper between layers if stacking to prevent sticking If you need them to last longer freeze for up to two months Thaw overnight in the fridge before serving for best texture
Ingredient Substitutions
You can swap in chocolate or vanilla cake mix for a different base flavor Just be sure to heat treat the flour first Dairy free cream cheese works for a vegan alternative Any color of chocolate or candy coating can be used for the outer shell For decorations use colored sprinkles or edible glitter instead of drizzled bark
Serving Suggestions
Pile cheesecake bites high on a cake stand for parties Add festive sprinkles right after dipping while the coating is wet For an elegant look serve each bite in a mini paper cupcake liner They pair especially well with coffee or as a sweet finish to a brunch
Cultural and Historical Context
Cheesecake bites combine the best of American cheesecake culture with modern dessert trends like cake pops and truffles The no bake preparation is rooted in quick party food traditions popular in the United States since the 1970s Flavored cake mixes rose to fame in that era making this a nostalgic update on classic treats
FAQs about Recipes
- → Do I need to bake the cake mix?
No baking is needed, but it's important to heat-treat the dry cake mix in the microwave to ensure safety.
- → Can I prepare these bites ahead of time?
Yes, you can shape them in advance and store covered in the refrigerator until ready to coat or serve.
- → How do I achieve a smooth candy coating?
Use melted candy wafers and roll each bite evenly. Let excess coating drip off before placing on parchment paper.
- → Can I use different flavors of cake mix?
Absolutely, feel free to experiment with chocolate or vanilla cake mixes for new flavor combinations.
- → How should I store the finished bites?
Keep the finished bites in an airtight container in the refrigerator to maintain freshness and texture.